This is a brief start of the Docker
The basic command of docker:
- docker pull # To pull the docker file
- docker images # To check the images
- docker rmi # To remove image
- docker build # To customize the docker image and build
- docker save # To save the image as a zip file
- docker load # To load the local zip file to docker
- docker push # To push the local docker file to the repository
- docker run # To run the stored image, download if not existed
- docker stop # To stop the running process in the container
- docker start # To start the stopped process in the container
- docker ps # To check the current running container
- docker rm # To remove the container
- docker logs # To check the logs
- docker exec # To enter the container
Here is the application of the above command:
(Note that you have to use the root access to use docker in wsl2)
You can save the image using the following command
docker save -o youFileName.extension IMAGEfor example:
docker save -o nginx.tar nginx:latestTo Delete the images in the docker:
docker rmi nginx:latestTo load the stored image:
docker load -i(input name) nginx.tar -q(optional quiet load, no logs)To create a container and run the image:
docker run -d --name nginx(your container name) -p 80:80 -e(optional environment variables) nginx(your image name)Here the -d means it runs in the backend, -p stands for a port mapping from the port of the container to the port of the real machine. -e means the environmental variables, no need to set here(But some images do need some environment variables).
Now, we can use “docker ps” to check the container in docker. The return value will be :
CONTAINER ID   IMAGE     COMMAND                  CREATED          STATUS         PORTS                               NAMES
f1b6e52ca9bf   nginx     "/docker-entrypoint.…"   12 seconds ago   Up 8 seconds   0.0.0.0:80->80/tcp, :::80->80/tcp   nginx
The information of a container is shown above. The container id is the unique identifier of a container and is a random string. Command refers to the starting command that runs in the docker. Created means the creation time. The Status means the current status of the container. It is made up of UP(DOWN) + operating time. Ports means the port mapping. Names is the name of the container. Apparently, the information above is quite cluttered. We can use the following method to simplify it:
docker ps --format "table {{.ID}}\t{{.Image}}\t{{.Ports}}\t{{.Status}}\t{{.Names}}"Stop the container like this :
docker stop nginx(your container name)After that we can not see the relevant information about the container by simply using “docker ps …” We have to add a “-a” at the end to check the stopped container.
To check the log of a container:
docker docs nginxAdd a “-f” like this to follow the track(keep logging)
docker docs -f nginxUse control + c to interrupt the process
To enter a target container:
docker exec -it nginx bashHere the “exec” means the execute. “-it” means adding a interactive terminal for the container. “bash” means using bash to interact with the container.
Type “exit” to return the main machine.
To delete a container:
docker rm nginxStop the container before you delete it~
Data Volume
Data volume is a virtual directory, it is a bridge for the mapping of the directory in the container and directory in the host machine
The root of the data volume in the host machine will be :
/var/lib/docker/volumes/Some code to manipulate the data volume:
docker volume create     # to create data volume
docker volume ls         # to check all the data volume
docker volume rm         # to delete the target data volume
docker volume inspect    # to check the information of some volume
docker volume prune      # clear the data volume
hint: You can only create the data volume when you create the container. Container can not “update” the volume. Also, if your directory name is not valid. The system will create a new one.
To check the detailed information of the data volume.
docker inspect nginxDocker File
The docker file is used to customize the image yourself. It is a text type file, including instructions. The instructions is used to assign the needed image. We can use the following command the build the image with the docker.
FROM               # To set the base iamge
ENV                # To set the environment variable
COPY               # To copy the local file to the image
RUN                # To run the linux shell command(installation)
EXPOSE             # To assign the runtime listenning port(for users)
ENTRYPOINT         # The start command in image(for container to run)
Here’s an example to build a java application:
FROM ubuntu:16.04
ENV JAVA_DIR=/usr/local
# copy jdk and the java project
COPY ./jdk8.tar.gz $JAVA_DIR/
COPY ./docker-demo.jar /tmp/app.jar
# install jdk
RUN cd $JAVA_DIR \ && tar -xf ./jdk8.tar.gz && mv ./jdk1.8.0_144 ./java8
# set up the environment variable
ENV JAVA_HOME=$JAVA_DIR/java8
ENV JAVA_HOME=$JAVA_HOME/bin
# export, the starting command of java
ENTRYPOINT ["java", "-jar", "/app.jar"]
Or use the existing ones:
FORM openjkd:11.0-jre-buster
COPY ./docker-demo.jar /tmp/app.jar
ENTRYPOINT ["java", "-jar", "/app.jar"]
Then we can use the following docker command to build the image:
docker build -t yourImage:1.0 .Here the “-t” is used for name the image, and the the dot at the end refers to the relevant root. Here it means “right here”.
Docker network
Here’ s some basic command to manipulate the internal network bridge in docker.
docker network create     # To create a network
docker network ls         # To check the network
docker network rm         # To delete a network
docker network prune      # To delete the unused network
docker network connect    # assign container for some network
docker network disconnect # To disconnect some container
docker network inspect    # To check the information of network
Also we can assign the network at the beginning, like this:
sudo docker run -d --name nginx -p 80:80 --network jade -v html:/usr/share/nginx/html nginxBy simply adding –network yournet to connect the preset docker network.
Docker Compose
Docker compose uses a independent docker-compose.yml to define a group of relevant application container, helping us rapidly deploy multiple connected docker container. Here’s difference:

The basic command is listed below:
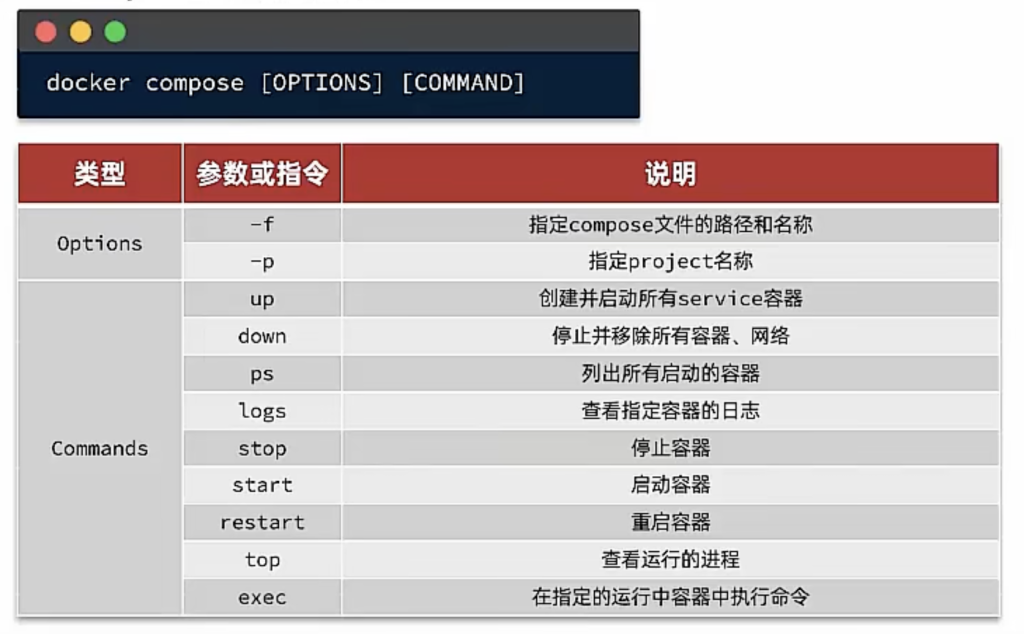
That’s all I know about docker!